Due to excessive spam abuse, unfake.it will soon begin to block URLs from various other URL shortening services such as http://bit.ly/. All incoming URLs (no matter if they’re injected via web or API) from blacklisted domains won’t be shortened any longer as of the effective date.
Effective date is: 2010-08-26 6pm UTC
Reasons ain’t to harm other shortening services, but to reduce spam. It’s a common practice of spammers to shorten and shorten and shorten their URLs through more and more shortening services. unfake.it won’t support such habits any longer.
If you intend to shorten formerly shortened URLs again and have the feeling that it’s okay, get in touch with me. We’ll find a way! Maybe by using an API key.
I feel sorry for all those 42.000+ short URLs, but there ain’t no other way to prevent further spamming. Already shortened URLs will remain valid, so they might still be accessed in the future.
Ich wundere mich seit Tagen über extrem angestiegenen Traffic für meinen URL Shortener unfake.it. Des Rätsels Lösung ist wohl sehr einfach: eine Google-Suche nach “url faker” liefert 19.400.000 Ergebnisse. Und unfake.it ist auf Platz 1 inkl. Mini-Sitelinks, Platz 2 ist mein Blog-Artikel über unfake.it vom 25. Januar 2009. Das ist ziemlich neu, da bin ich mir relativ sicher.
Da wundert mich nichts mehr. Leider, leider gerät das System aber so langsam aber Sicher an die Lastgrenzen und ich muss mir überlegen, ob ich nicht doch eine meiner Regeln breche, denn ich hatte ursprünglich beschlossen und kommuniziert, dass unfake.it niemals Werbung vor oder nach dem Klicken einer Kurz-URL anzeigen wird.
Was meint ihr? Sollte ich Werbung schalten und so ggf. neue, schnellere Hardware finanzieren? Oder findet sich ggf. irgendwo ein freundlicher Sponsor? Bin gerne bereit, darüber zu verhandeln 🙂
You may shorten URLs using unfake.it URL Shortener right inside your TweetDeck application. This is how to do so:
- Open TweetDeck’s preferences
- Choose Services
- Switch URL shortening service (usually bit.ly) to Other
- Type
http://unfake.it/?a=api&url=%@in the field beside that pulldown menu - Hit Save Settings
- Enjoy!
Long URLs, typed into TweetDeck’s “What’s happening?” box, will now be shortened immediately using unfake.it.
Hi there,
during the past few days, unfake.it‘s performance increased dramatically. Several scripts and jobs have been moved onto new servers, the database structure and various SQL statements have been enhanced and even SQL SELECT statements have been optimized to more and more use readonly slave servers. Most URLs are being faked in much less than a tenth of a second. The magical previews of faked URLs are generated almost instantly, since performance increased dramatically.
Unfortunately, faked URLs weren’t posted to Twitter when using the WordPress Plugin during the past 4 hours due to a tiny misconfiguration. This issue could be solved.
unfake.it has become a more and more commonly used URL shortener during the past months. Almost 1.000 URLs are faked in a 24 hour period, even though this magic edge has not yet been crossed. See the stats for more information ’bout that.
Bye, Thomas
Hi there!
Quite a while ago, I started writing my first and own facebook application. I got stuck while trying to publish content to my own profile page and also to my friends’ newsfeeds. I stumbled upon several problems. Either there was no content displayed, it was formatted in a wrong way, it was not published on my friends’ newsfeeds or it even was published on behalf of my friends’ username. It was quite strange to me and I could not find an easy documentation on how to do it the right way.
I played around with Stream.publish, Feed.publishUserAction or Notifications.send – none of those functions did what I wanted them to do. This may be so, because I did not fully understand their purposes.
So, this is my way to do it. I am using the FBJS (FaceBook JavaScript) popup call Facebook.showFeedDialog. This is truely (as far as I’m concerned) the best and easiest way.
First of all, I assume you are familiar with how to build an facebook application from scratch. If not, please read the developer’s documentation.
Step 1: build and register your Feed Template Bundle
- go to the Feed Template Console
- choose your application and hit “Next”
- create a template for your “One Line Story” and hit “Next”
- create a template for your “Short Story” and hit “Next”
- create Action Links and hit “Next”
- hit “Register Template Bundle”
- copy and save the Template Bundle ID given in the popup (you will have to paste it into your application’s code later)
When doing this, you may enter any text or even HyperText in the fields for the One Line or Short Story. You also may enter predefined tags such as {*actor*} or your own defined tags such as {*foobar*}. In the Sample Template Data, you may enter the tag definitions and display a preview. What you enter there and at this very moment has no effect on the content displayed within your application later! That’s just for previewing purposes. The real content will be defined later in your application’s script. Remember that! Some Examples for your Sample Template Data at this point may be:
{"foobar": "This is a foobar text"}
Or a bit more complex:
{"foolink": "<a href="http://www.google.com/">Google</a>",</p>
<p>"images":[{"src":"http://domain.com/image1.jpg", "href":"<a href="http://www.facebook.com/">http://www.facebook.com</a>"},</p>
<p>{"src": "http://anotherdomain.com/image2.jpg", "href":"<a href="http://www.facebook.com/">http://www.facebook.com</a>"}]}
You see, e.g . the {*images*} tag is defined as some sort of array consisting of multiple SRC and HREF values. Attention: the special tag {*images*} is displayed automatically on Short Stories, you don’t need to call them!
2. write your application’s content
<?PHP</p>
<p>require_once 'facebook-platform/php/facebook.php';</p>
<p>$appid = 'xxxxxxxxx'; // your app ID</p>
<p>$appapikey = 'XXXXXXXXXXXXXXXX; // your app key</p>
<p>$appsecret = 'XXXXXXXXXXXXXXXX'; // your app secret</p>
<p>$template_bundle_id = 'xxxxxxxxxxxxxxxx'; // the ID you got in Step 1</p>
<p>$facebook = new Facebook($appapikey, $appsecret);</p>
<p>$user_id = $facebook->require_login();</p>
<p>echo "<p>Hello, <fb:name uid=\"$user_id\" useyou=\"false\" />!</p>";</p>
<p>?></p>
<p><script type="text/javascript"><!--</p>
<p>    var template_bundle_id ="";</p>
<p>    var url="http://www.google.com/";</p>
<p>    var user_message_prompt = "Share this URL with your friends?";</p>
<p>    var user_message = {value: "wants to share a greate website."};</p>
<p>    var image ="http://www.google.com/intl/en_ALL/images/logo.gif";</p>
<p>    var template_data = {"url": url,</p>
<p>                                  "images": [{'href': url, 'src' : image}]};</p>
<p>    Facebook.showFeedDialog(template_bundle_id, template_data, '', '', '', user_message_prompt, user_message);</p>
<p>// --></script></p>
<p>
This is it.
Every time you call your application’s page, you’ll get a facebook popup asking you to display the content on your profile and even in your friends’ newsfeeds. Of course, it does not make any sense to share some data every time you call your application’s canvas page, so you may want to add some more code to your application.
The text to be shared is the text you entered when registering the Template Bundle in Step 1. If you get an error, please make sure the defined variables (such as “url” or “images”) are valid and do exist. In other words: whatever you call in your Template Bundle, it has to be defined in your script.
Of course, you may generate the content dynamically from a database or any other source.
I hope this HOWTO helped.
Bye, T.
Hi there,
after several months, unfake.it has become even more important in the Web2.0 community. A few weeks ago, I was talking to some guys and co-workers about programming and such things. I then told about unfake.it and a co-worker of mine said, he somehow stubled upon http://unfake.it/ and uses it irregular. That was quite funny to me.
I’ve had very few time the past months and since I got stuck on the half way because of some WordPress problems and also some problems with facebook’s API and FBML, there was no more development. But now I’m proud to announce that today, I released a completely new version including new features:
WordPress plugin version 1.2
The new plugin comes with its own settings page and adds two own tables to your WordPress installation. The main purpose is to let you configure, whether or not you wish to be taken to facebook and add the shortened URL for your new blog post (including a thumbnailed screenshot) to your facebook profile page and even in your friends newsfeeds.
Facebook application
unfake.it now has its own facebook application which lets you add shortened URLs, lists them as screenshots in a profile box, displays about new URLs on your profile wall and even tells your friends about it in their newsfeeds. Want an example? See:
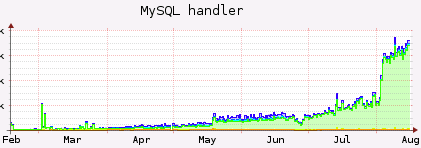
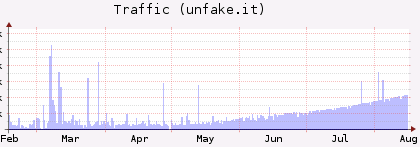
Since a few hundred URLs are shortened every single day, I also had to do some enhancements to the database structure and especially to the thumbnailing process. Just think about it: at the moment, we have more than 20,000 shortened URLs, each of them was once and initially thumbnailed, stored and is re-fetched every few days, if still hits occur. That’s a lot of traffic and a lot of CPU power. Just take a look how MySQL handlers and Apache traffic increased the last months:
You may see most recent stats at http://unfake.it/stats.php.
Please let me know, if you have any problems with the new version of the WordPress plugin and especially what you think about the facebook application.
Bye, T.
Hi there!
 Do you know this problem?! You have to get up at some certain time in the morning, so you set up your alarm clock to give you a friendly “rrrrrrring-rrrrring”. But you simply don’t wake up! Your alarm clock rings and rings and rings for like hours but you simply don’t hear it. Sometimes, you use the snooze button, but you cannot even remember you did it.
Well, that’s like how I feel sometimes in the morning. Bad thing, if you have some kind of meeting or appointment. Several times in the past, I sent automated e-mails to my co-workers to give me a wakeup call on my cellphone, this surprisingly always works. But it’s annoying. For me and my co-workers.
Here comes the solution:
use nagios to give you a highly sophisticated wakeup call.
Imagine, you have a linux box which is under surveillance of a nagios remote monitoring system. And imagine furthermore, this nagios system is configured to send out voice calls in cases of critical states. All you need is a new plugin (most commonly via NRPE) which tells nagios to initiate your wakeup call.
This is how I do it:
1. Add the following line to your NRPE config file on your linux box (e. g. /etc/nagios/nrpe.cfg):
command[wakeupcall]=/usr/lib/nagios/plugins/wakeupcall
2. Create the plugin and place it on your linux box at /usr/lib/nagios/plugins/wakeupcall
#!/bin/bash
#
# nagios nrpe plugin to initiate a wakeup call
# 2009, Thomas Gericke, thomas (at) thomasgericke (dot) de
#

FILE="/etc/wakeupcall/wakeupcall"

if [ -e $FILE ]; then
        echo "Wakeupcall needed. Gonna hit ya!"
        exit 2
else
        echo "No wakeupcall needed. Sleep well."
        exit 0
fi
3. Restart your NRPE service on your linux box (e. g. /etc/init.d/nagios-nrpe-server restart)
4. Set up the service check in your nagios configuration on your nagios server
I assume, you already have the host configured on your nagios system and you already are familiar with nagios’ notifications. Here’s the service check you need:
define service {
        use                     generic-service
        max_check_attempts      1
        notification_options    c
        service_description     Wakeup Call
        host_name               YOUR.HOST.NAME
        check_command           check_nrpe!wakeupcall
        contact_groups          YOUR_CONTACT_GROUP
}
I hope you’re familiar with nagios’ service check templates and such stuff.
5. Reload your nagios on your nagios server (e. g. /etc/init.d/nagios reload)
6. Create the wakeupcall config directory on your linux box (mkdir /etc/wakeupcall/)
7. Set up a file for an at-job on your linux box (e. g. ~/add.wakeupcall)
touch /etc/wakeupcall/wakeupcall
8. Set up an at-job on your linux box once you need to be woken up
at -f ~/add.wakeupcall 06:40
Your linux box will create /etc/wakeupcall/wakeupcall at 6.40AM (the very next time this moment occurs), nagios will realize it and will initiate the notification. If you have configured your nagios server to send out voice calls to your cellphone, you will receive a wakeup call.
Have fun, comments are appreciated! 🙂
Hi there!
I have to thank you! All of you, using unfake.it as URL shortening service!
It’s been 100 days, since I faked the first URL with unfake.it – my very own URL shortening service. I started this project, ’cause I always forgot the names of all the other URL shortening providers, so I very quickly wrote my own application, which now is used every day by lots of users.
What began for my personal use only, has now become a huge and important project. A few days after the initial launch – and even without heavy announcement, the first people started using unfake.it to shorten URLs. Using the bookmarklet, some friends and co-workers started using unfake.it and spreading the URL all over the world.
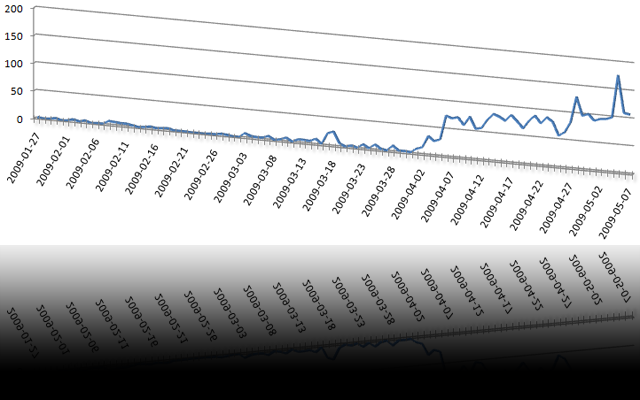
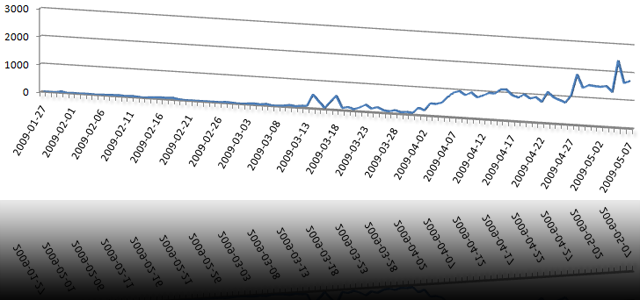
Then, I implemented an API and wrote a standalone WordPress plugin to shorten URLs for new blog postings before sending them to Twitter. Since March, this plugin is downloaded and installed on new WordPress blogs almost every day a couple of times, which really makes me proud. Today, several co-workers as well as absolutely unknown users all over the globe are using my plugin. And there’s an huge number of hits per day:
Then, I implemented the magic preview function with thumbnailed images of the destination websites. Then I wrote a facebook application to add faked URLs and their thumbnails to your facebook profile. Those are just toy-like features, but I relly like them – as well as lots of users.
Some facts of what has happened so far (or is happening):
- more than 3.000 URLs have been faked up to now
- there are more than 42.000 hits to those URLs up to now
- the last 3 days, more than 100 new URLs have been added per day
- URLs for more than 130 unique websites have been faked up to now
- the WordPress plugin has been downloaded and most likely installed more than 80 times
- Twitter knows more than 850 faked URLs of the last 7 days
- Google knows more than 20 pages of faked URLs
- unfake.it is growing every day
I’m really looking forward to unfake.it‘s future. Sure, there is an increasing number of shortening services, but I guess, some of ’em will disappear again.
Bye, T.
Hi there!
A few days ago, I started to write my first own facebook application. It all went quite okay until one certain point: I wanted my application to update the profile box of the user, which uses the app at that single moment. And that wasn’t as easy, as I thought.
The problem was: after the profile box has been updated, all profile boxes of all users had the same content – the content of the user who last updated his profile box.
I will come to the solution later. First of all, a quick explanation of what I needed to do:
- I read the documentation of facebook’s application guide to understand the API and the FBML language
- I set up my own application using the step-by-step guide
- I set up my new application on my own host including facebook’s PHP libraries
Here’s the code step-by-step (just put all sniplets together):
Code sniplet #1
require_once 'facebook-platform/php/facebook.php';

$appid = 'xxxxxxxxxxxx';
$appapikey = 'xxxxxxxxxxxxxxxxxxxxxxxxxxxxxxxxxxxx';
$appsecret = 'xxxxxxxxxxxxxxxxxxxxxxxxxxxxxxxxx';

$facebook = new Facebook($appapikey, $appsecret);
$user_id = $facebook->require_login();
Above: first of all, we need to include facebook’s PHP libraries, define several variables for our application, initialize our facebook object and retrieve the UID of the user who currently uses the application.
Code sniplet #2
$fb_box = "<H4 class='box_header clearfix'><span>";
$fb_box .= "Hello World!";
$fb_box .= "</span></H4>";
$fb_box .= "<div>I am ";
$fb_box .= "<fb:name uid=\"$user_id\" useyou=\"false\" />.";
$fb_box .= "Nice you're on my page.</div>";
$fb_box .= "Some more content in HTML or FBML...";
Above: we then define the content which we want to be displayed within the profile box. In this examble, it will be the name of the user, greeting the visitor.
Code sniplet #3
$fb_box_handle = 'pb_' . $appid . '_' . $user_id;
Above: this is important! At this point, I got stuck for a while. The reason was, facebook caches profile boxes content until the application’s canvas page is requested for the next time. The handle is very important for that caching mechanism, since it has to be a unique identifier for each application and each user. For that reason, I simply use the prefix ‘pb_‘ followed by the applications ID (defined above) and the UID of the current user (also defined above)!
Code sniplet #4
$facebook->api_client->call_method('facebook.profile.setFBML',
array(
'api_key' => $appapikey,
'v' => '1.0',
'uid' => $user_id,
'profile' => '<fb:narrow><fb:ref handle="' . $fb_box_handle . '" /></fb:narrow>',
'profile_main' => '<fb:ref handle="' . $fb_box_handle . '" />',
)
);
Above: the rest is quite simple. We make an API call to facebook and send our application key, the protocol version, the UID of the facebook user whose profile box ought to be updated and, of course, the content for that box. The content will be sent as the reference handle we defined earlier.
If you want to update multiple profile boxes with one single API call, I guess, this could work if you send an array containing the UIDs. If not, you can still get all those UIDs, walk through the array and perform multiple API calls. I read somewhere, some users had problem updating large numbers of profiles… Just give it a try.
Comments (if it worked for you or even if it didn’t) are appreciated 🙂
UPDATE because of comment #2:
The example above is about updating content in a users profile, not about setting up a profile box on a profile. You should read the manual carefully.
A user has to approve a certain application to create a profile box. Therefore, you need to render a button, which sets up the box. You can easily do this by:
$appapikey = 'xxxxxxxxxxxxxxxxxxxxxxxxxxxxxxxxxxxxxxx';
$appsecret = 'xxxxxxxxxxxxxxxxxxxxxxxxxxxxxxxx';
$facebook = new Facebook($appapikey, $appsecret);
$user_id = $facebook->require_login();
$facebook->api_client->profile_setFBML($appapikey, $user_id, 'profile', NULL, 'mobile_profile', 'profile_main');
echo "<fb:add-section-button section='profile' />";
The last line renders the button, you want to have on your canvas page.
Good luck! Thomas


